|
||||||||||||
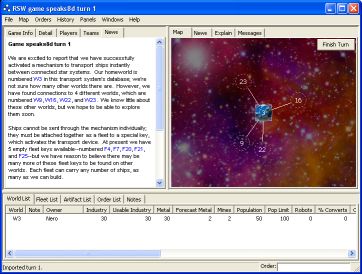
When you next start the RSW Client, the new game will automatically download into the client, and when you click on it, you'll see something like this:

This is the Game Window, and this is where you will do most of your interaction with the game. The Game Window consists of three different panels, each of which contains several tabs across the top, allowing you to select between the various pages of information available for each panel.
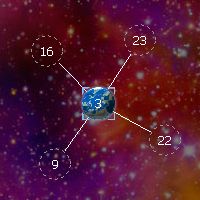
Once you have read the Turn News panel in the center, you may want to switch to the upper-right panel to the Map view, which gives you more room to work with. Take a closer look at the map. The RSW Client has drawn your homeworld, world 3, on the map in color, and it shows four worlds connected to it, numbered 9, 16, 22, and 23.
These other worlds are the worlds that you can reach directly from your homeworld. The RSW Client doesn't really know what order or placement to use for these worlds; it's just a shot in the dark, and you might need to move them around later, as you discover more connections to other worlds. (Though note that in some RSW games, depending on the game settings, the worlds might be placed automatically in their correct position, and you don't have to move them around yourself.) For now, click and drag the worlds around to any configuration that pleases you, giving plenty of space for filling in the new worlds you'll discover later, something like this:
Now click on the "Detail" tab on the upper-right panel, to bring the Detail panel to the foreground, and then click on the colored world in the map representing your homeworld, to select your homeworld, world 3. You will see the following display in the detail panel:
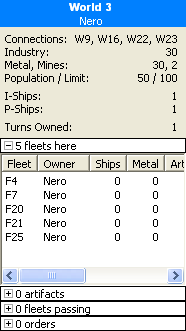
As you can see, your homeworld has 30 industry, 30 metal, 2 mines, and 50 population, with a population limit of 100. Furthermore, you have 1 I-Ship and 1 P-Ship, and the "turns owned" counter is 1.
You can also see the five fleets you have. You always start each game with a random set of five empty fleets. In this example, you have fleets 4, 7, 20, 21, and 25; and as expected, each of them has 0 ships.
On your first turn, you should almost always build up your 30 ships onto your fleets, and then send your fleets to visit the connected worlds. We'll issue the orders to do that now. Right-click (or, on a Mac, control-click) on the World title to pop up the orders menu, and select "Build ships onto F4," like this:
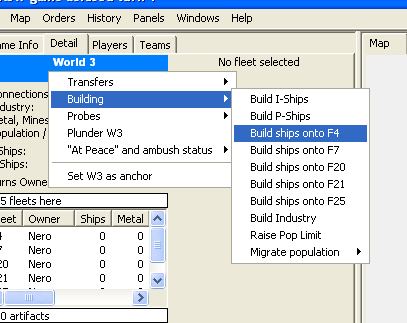
When prompted, enter that you want to build 6 ships, and then do the same thing for the other four fleets. Congratulations! You have entered the five build orders. If you were to click on the Orders tab in the bottom panel, you would see those orders, like this:

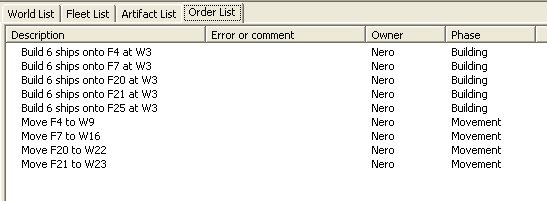
Now that we've built 6 ships onto each of our fleets, let's order them to explore the connected worlds. Once again, right-click (or control-click) on the World title, and this time select "Move F4 to W9", and then do it again for each of the other fleets, picking a different world for each one. We'll arbitrarily send fleet 4 to world 9, fleet 7 to world 16, fleet 20 to world 22, and fleet 21 to world 23. That leaves fleet 25 still sitting at home, but we don't have a fifth world to visit, so it can just wait till next turn.
The order list now looks like this:
Congratulations! You have entered the orders for your first turn.
It's often a good idea to double-check that you have entered the orders you think you have. One easy way to do this is to select "Project turn 2" from the History menu. This will switch the game view to a hypothetical turn 2, to show you what would happen when all of your orders are performed. It can't show you what will definitely happen on turn 2, because it doesn't know what orders the other players may enter, and it doesn't know anything about the worlds you haven't visited yet, but it will give you a good idea of what you have ordered your fleets and worlds to do, at least.
While you are in this project-next-turn view, click on each of the worlds, and confirm that they now have one of your fleets visiting them, and that each fleet has 6 ships. If all is as you expect, then pick "View turn 1" from the History menu to go back to the normal, current turn's view.
There's still one more, very important step to be done. You need to submit your orders to the server, or they won't count. Click the "Finish Turn" button on the map, click OK to accept the confirmation dialog, and then sit back and wait for the other players to submit their orders too.
|