|
||||||||||||
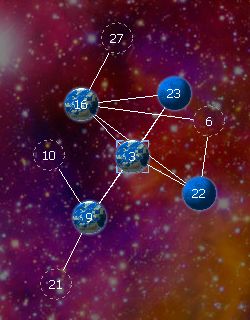
Remember, last turn, you moved a fleet to each of the four worlds your homeworld connects to (and, in doing so, you captured those four worlds, so you own them now--note that they're now drawn in the same color as your homeworld, to represent this). Your fleets have sent back a complete report on those four worlds, including the worlds they connect to, and so the RSW Client has automatically integrated that data on the map (and in this particular sample game, the worlds are not positioned automatically for you).
The RSW Client won't reposition any of the worlds that were already on the map, and now the new connections make it apparent that our original guesswork wasn't correct. For instance, since world 16 and world 22 both connect to each other (and also since they both connect to world 6), they should probably appear next to each other on the map.
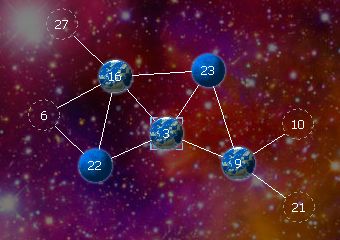
Click and drag the worlds around to straighten out the map. You should be able to find a placement for all the worlds that requires a minimal crossing of the lines that connect them. When you're done fixing the map, you may have something that looks more like this:
Now you can study what you've learned about the various worlds. Once again, bring up the Detail panel in the upper-left panel, and click on each new world, one a time, to read about the properties of each world.
(Note that there are also other ways to study the world properties, rather than click on them one at a time. For instance, you can use the world list in the bottom panel to get an overview of all worlds at once. There are also options in the Preferences menu to display some world properties visually in the map display. For now, though, we'll just use the Detail panel.)
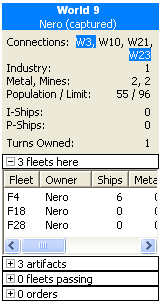
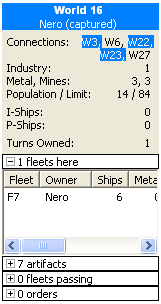
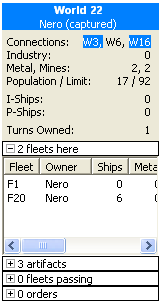
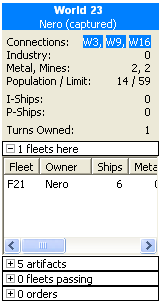
That fact that your name--Nero--is written in the world title for each new world is confirmation that you are the new owner of each of these worlds. Now take a moment to read the metal, mines, population, and population limit of each world. You can also see that there are a number of artifacts at each world; if you wanted to see more about that, you would click on the line that says "3 artifacts" (or whatever number) to expand the list of artifacts.
Now note that, in addition to the four new worlds, you have also acquired three new fleets in your name: F18 and F28 are at W9, and F1 is at W22. You can--and probably should--immediately transfer some of your ships over to these new fleets, and put these fleets into active service.
Let's also take a moment to see what's going on at your homeworld:
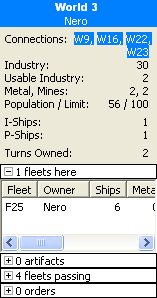
There's a new line displayed here: "Usable Industry: 2". This means that although you have 30 industry, only two of it is ready to build this turn. The reasons that some of your industry cannot build will vary, but in this case it is because you only have two metal this turn. (This is the metal that was produced by your two mines last turn.) If you ever have any question about why all of your industry isn't available to build, or some similar question, you can click on the Explain tab, which will explain the reasons for each current limitation at the selected world.
Now that we've studied the current situation, we're ready to input some orders. We need to send at least one fleet to each new world, to continue expanding as quickly as possible; so we'll start by sending fleet 7 to world 27. From world 9 we now have two new fleets, numbered 18 and 28, so we'll send these to worlds 10 and 21, respectively. (We have to transfer some ships to these fleets before we can use them, so we'll divide the six ships on fleet 4 three ways, and put two ships on each of fleet 18 and fleet 28.)
That just leaves world 6. We still have fleet 25 sitting at our homeworld, unused since the first turn, so we'll send that one over to world 6. We'll order this fleet to move through world 22 to arrive at world 6--a fleet can move through up to two worlds like this, to arrive at a third world in one turn.
Finally, at world 22 we have a couple of fleets that aren't being used for anything, so we might as well use one of them to bring a bit of metal back to our homeworld--every little bit helps. There are only two units of metal to bring back, so we only need two ships to carry it--so we'll order fleet 20 to transfer two ships to fleet 1, and then order fleet 1 to load up the metal there and then send the fleet back to our homeworld.
We're doing quite a bit all in one turn with fleet 1--we transfer two ships to it, load two metal onto it, and move it to our homeworld. This all works, because according to the game rules, transfers happen before loading metal, which happens before movement. This is always true, regardless of the sequence in which we added these orders. (Even if we had ordered the fleet to move to our homeworld first, and then ordered it to load metal, it would load metal first, from world 22, and then move to our homeworld.)
Now the only thing that we haven't done is give any orders to industry. There is one unit of industry on world 16 and another one on world 9, plus the industry we have on our homeworld. Let's take advantage of this industry to build ships onto our fleets, so we'll order world 9 to build one ship onto fleet 4, and order world 16 to build one ship onto fleet 7. At world 3, our homeworld, we'll build two ships onto fleet 25. Note that building, like loading, takes place before movement, so we can build onto these fleets even though we've already given each of them orders to move to a different world.
Use right-click (or control-click, on a Mac) on each relevant world, to enter each of these orders. The order list now looks like this:
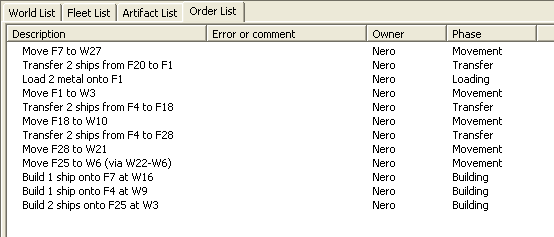
If you have any doubts about the sequence in which the orders will be executed, you can click on the last column, which will group the orders into their execution phases, and then sort those phases into the order in which they will be executed.
Now, just as we did with the first turn, it's useful to project the next turn as a sanity check, before submitting the orders. Pick "Project turn 3" from the History menu, and examine the resulting sitatuation. Make sure that your fleets ended up at the worlds you expected them to.
Once you're happy with the new orders, go back to viewing turn 2, click the "Finish Turn" button, and click OK to send them to the server.
|